Monday, August 31, 2015

Gatling : How to perform a simple load testing using Gatling

Gatling is a load and stress testing tool with high performance based on Scala. In our previous post we have discussed on Gatling and things to know to work with Gatling. In our last post we have shown on how to install and run Gatling and its folder structure. Now we will discuss on how we can conduct a simple load test using Gatling.

We will do load testing on the following test case.

  1. Open the Browser and go to the site : http://www.bing.com/
  2. Enter the text “Gatling” at search text box
  3. Click Search button and Gatling related page with link is displayed
  4. Click on the link text “Gatling - Official Site”.

In Gatling, we call this test cases as scenario that needs to test load and stress. Scenario is the real user activity on the application.

Step 1 : Configure Browser

In order to record our scenario using Gatling, we need to configure our browser proxy settings at first. The following steps will show you how to configure chrome browser for Gatling recording.

  • Open the Chrome Browser.
  • Click on Customize and control Google chrome button located at top right corner. A drop down menu is displayed.

    image

    • Click on Settings option

    image

    • Settings page is displayed.
    • Scroll down to the bottom of the page and click on Show Advanced Settings link to expand the page.

    image

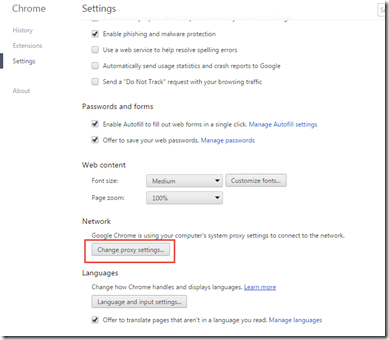
    • Click on Change Proxy Settings…

    image

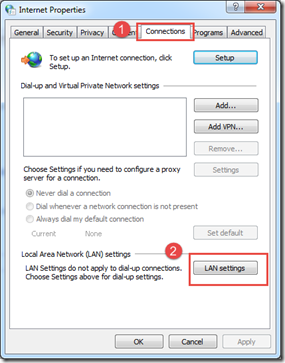
    • Internet Properties window is displayed and click on Connections tab.
    • Click on LAN Settings button.

    image

      • LAN Settings window is displayed
      • Uncheck “Automatically detect settings”
      • Check the “Use the proxy server for your LAN” options
      • Type address as “localhost” and port as “8080”
      • Click OK button of the LAN Settings window

      image

      • Click OK button of Internet Options window
      • Close the browser window.

    In case of other browsers almost same steps can be followed. For more details you can see one of my post on browser proxy settings.

    Step 2 : Recording the Scenario

    • Go to the bin folder (in my case : C:\gatling-charts-highcharts-bundle-2.1.7\bin) of Gatling bundle.

    • Double click on the “recorder.bat” file.

    image

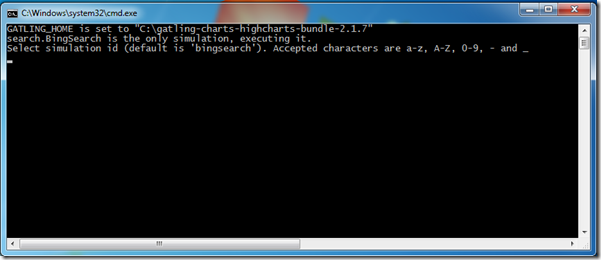
    • A command prompt window is displayed.

    image

    • Recorder window is displayed.

    image

    • Enter the port number in the local host box ( In my case 8080).
    • Enter Package name as “search”
    • Enter class name as “BingSearch”.
    • Check “Follow Redirects”, “Infer HTML resources”, “Remove Cache Headers” and “Automatic Referrers” options.
    • Select the output files path. In my case (C:\gatling-charts-highcharts-bundle-2.1.7\user-files\simulations). Note that it is good to select simulation folders by default so that user does not need to copy the recorder file at the time of load testing.
    • Keep all the other options same. Don’t change any existing options.
    • Click on Start button.

    image

    • Open Google chrome browser.
    • Go to the URL : http://www.bing.com/
    • Enter the text “Gatling” at search text box
    • Click Search button.

    image

    • Gatling related page with link is displayed
    • Click on the link text “Gatling - Official Site”.

    image

    • Close the browser.
    • Click on “Stop & save” button and Gatling recorder window is closed.

    image

    • Recorder file named “BingSearch.scala” is saved created and saved to “C:\gatling-charts-highcharts-bundle-2.1.7\user-files\simulations\search” directory.

    Note that file name is the class name with extension .scala and it is located at folder named “search” that is same as the package name that we entered at the recorder window. This folder structure should be followed for load testing.

    image

    • If we open the scala file by notepad++ it displays script using Scala programming language. We will discuss more on scala script in our future post.
    • We can configure user through this script. By default it sets load for single user. It has setUp() method to configure user.

    image

    In our future post we will show how we can modify the script to configure different load.

    Step 3 : Executing load testing using Gatling

    • Go to the bin folder (in my case : C:\gatling-charts-highcharts-bundle-2.1.7\bin)
    • Double click on the “gatling.bat” file.

      image

    • A command prompt window is displayed and then load testing instructions are displayed on the command prompt window. In our case, it shows the test name as “BingSearch.scala” at the command prompt. And the command prompt displays the series of instructions.
    • Command prompt window look like the following now.

    image

    • Since there is only one simulation file default simulation id is “bingsearch”. So enter this name and press Enter key.

    image

    • After pressing Enter key from keyboard, this window look like the following. It ask for optional run description.

    image

    • Most of the cases run description will be the objective or title of the test cases. Number of users and nature of load. It is mean that anybody can understand about the goal of the load test to read this description.
    • In my case, “Search a word by Bing. Number of User : 1”. Press Enter key.

    image

    • After pressing Enter key simulation starts.

    image

    • After finishing simulation it displays the result link that generate report in HRML format.

    image

    • Copy the report path and press enter key to close the command prompt window.
    • Go to the result path (In my case : C:\gatling-charts-highcharts-bundle-2.1.7\results\bingsearch-1441322261378) and it shows the sets of html file.

    image

    • Double click index.html file to open the report and it opens the report in chrome browser.

    image

    We will discuss details on report feature in our future post.

    Happy Load testing using Gatling!!!…

    Thursday, August 27, 2015

    Gatling : How to download and install Gatling and its folder structure

    In our previous posts we have discussed what is Gatling and the matters that we need to know to work with Gatling.

    Here we will show how we can download and run Gatling.

    Pre-Requisite :

    Gatling requires JDK7 package (JDK7u6). It is recommended to install latest JDK. How to install Java on a windows machine can be found by previous post. So install JDK at first to start working.

    Download :

    Step 1 : Go the URL : http://gatling.io/#/download and click on the link “Gatling bundle (zip)”. Note that the latest release is now Gatling 2.1.7.

    image

    You can also use Maven to install Gatling. We will also discuss it on our future post.

    There is no specific installer or exe file for Gatling. Only the bundles that needs to download and unzip.

    Step 2 : After finishing download, unzip the zip file (gatling-charts-highcharts-bundle-2.1.7-bundle.zip).

    Step 3 : Go to the “gatling-charts-highcharts-bundle-2.1.7-bundle” folder and inspect the following sub folders.

    image

    Folder structure :
    Folder structure is as following:

    bin : bin folder contains the launch file for Gatling and the Recorder.

    There is a file named “recorder.bat” used for recording user scenario that is used for load testing in Gatling.

    There is another file named “gatling.bat” used for starting the Gatling application and executing and generating load testing report.

    image


    conf folder : It contains the configuration files for Gatling, Akka and Logback. How to configure Gatling by modifying configuration file will be discussed on our later post.

    image

    lib : It contains the binaries used by Gatling. Basically it contains jar files.

    image

    results : It contains all reports that is generated as sub directory. Every sub directory is the report for a single load test.

    image

    Reports are generated as html format. It also generate simulation.log file that contains all the logs at the time of executing load test.

    image

    target : It contains all the test classes used in load testing.
    user-files : This folder contains all the user scenarios. Use scenarios are recorded as a Scala file format and copied here. There are three sub directories.

    image

    Simulations : It contains all the user scenarios as Scala files. Scenarios are stored here as a specific folder structures that will be discussed on our later post.

    data : It contains feeder files. We will discuss more on feeder files later.

    bodies : It contains templates for request bodies.

    Run the Recorder :

    Step 1 : Go to the bin folder (in my case : C:\gatling-charts-highcharts-bundle-2.1.7\bin)

    Step 2 : Double click on the “recorder.bat” file.

    image

    A command prompt window is displayed and then recorder window is displayed.

    image

    image

    Run Gatling :

    Step 1 : Go to the bin folder (in my case : C:\gatling-charts-highcharts-bundle-2.1.7\bin)

    Step 2 : Double click on the “gatling.bat” file.

    image

    A command prompt window is displayed and then load testing instructions are displayed on the command prompt window.

    image

    How we can record user scenario and executing load testing using Gatling will be discussed on our next post. Until then…

    Happy Load testing using Gatling!!!…

    Tuesday, August 11, 2015

    Gatling : Things to know to work with Gatling

    Virtual User : Some load testing tools can’t deal with logic between requests but Gatling can deal with virtual users, each one having its own data and maybe taking a distinct browsing path.

    Some tools implement those virtual users as threads but Gatling implements them as messages that scales much better and can deal easily with thousands of concurrent users.

    Scenario : Gatling represents user’s behavior as scenario which is written as scripts following Scala syntax. Creation of the scenarios is very important as it is the key to meaningful results of the load test.
    So it should be designed in such a way that represent true users behavior. Virtual users will follow the scenario that represents a typical user behavior.

    For example, a standard search application scenario could be:

    1. Open the Browser and go to the site : http://www.bing.com/
    2. Enter the text “Gatling” at search text box
    3. Click Search button and Gatling related page with link is displayed
    4. Click on the link text “Gatling - Official Site”

    Scenarios are represented as scripts in conjunction with a DSL (Domain Specific Language). This allows fast writing of scenarios and easy maintenance of existing scenarios.

    If we want to write the above scenario using DSL then,

      scenario("GatlingSearch")
      .exec(http("Go to Bing Site").get("http://www.bing.com/")
      .pause(10)
      .exec(http("Search with the word 'Gatling'").get("http://www.bing.com/search?q=Gatling")
      .pause(30)
       .exec(http("Click in the link Gatling - Official Site").get("http://gatling.io/#/")
      .pause(10)

    Note in this scenario, “GatlingSearch” is the scenario name, contains 3 HTTP Requests and 3 pauses.
    Pauses are used to simulate user think time. HTTP requests are actually sent to the application under test when a user clicks on a button or a link.

    Simulation : Simulation defines how many users will perform the scenario. There may be different types of users and their numbers are different for different scenario. It also defines on how virtual users will be injected. All the users execute the scenario at a time or ramp up in a certain time period.

    For example,

    val standardUser= scenario("Scenario X")
    val adminUser= scenario("Scenario Y")
    val advancedUser= scenario("Scenario Z")

    setUp(
      standardUser.inject(atOnceUsers(2000)),
      adminUser.inject(nothingFor(60 seconds), rampUsers(5) over (400 seconds)),
      advancedUser.inject(rampUsers(500) over (200 seconds))
    )

    Session : Each virtual user is backed by a Session that is basically a state placeholder, where testers can inject or capture and store data.

    Feeders : Feeders are API for testers to provide test data from an external source into the virtual users’ sessions since Gatling doesn’t provide any tools to generate test data.

    Checks : Gatling analyze and verifies the response using Check which is a response processor that captures some part of response and verifies that it meets some given condition(s). It can also be used to capture some elements and store them into the Session so that they can be reused later.

    Assertions : Assertions are used to define acceptance criteria on Gatling statistics that would make Gatling fail and return an error status code for the test as a whole.

    Reports : Reports are automatically generated by default at the end of a simulation. They consist of HTML files that are portable and can be viewed on any device with a web browser.

    We will discuss more on everything on our future post.

    Happy Load testing using Gatling!!!

    Tuesday, August 4, 2015

    Gatling : What is Gatling?

    Gatling is an open source performance testing tool. It is a framework based on Scala, Akka and Netty. It is a high performance tool and it provides user friendly html reports. Script is easy to maintain and customize. It has recorder and developer friendly DSL.

    Gatling is a highly capable load testing tool designed for ease of use, maintainability and high performance. Gatling has excellent support of the HTTP protocol. Beside that it supports other protocol.

    In Gatling, a simple scenario is recorded for load testing an http server. Scenarios are defined in code using DSL and are resource efficient, can be maintained easily and kept in version control system.

    Gatling’s architecture is asynchronous. Virtual users are implemented as messages instead of dedicated threads. It makes them very resource cheap. Thus, running thousands of concurrent virtual users is not an issue in Gatling.

    Four Basic steps to complete Gatling :

    • Record : You can record any activities of your web application using Gatling. It can record from any browser and any activities even the think time.
    • Edit : Recorded script can be customized and edited easily as it is easy to read and developer friendly.
    • Launch : It can be launch through windows command prompt or Linux terminal. It can run through Maven build or Jenkins.
    • Analyze : Gatling provides some clear, exhaustive, dynamic and colorful reports and they are HTML format. Report can be Zoom in and zoom out. From the report it can be easily pointed out performance issues.

    Things to do using Gatling :

    • Gatling’s scenario can be distributed and reused.
    • Different virtual user’s can be configured with different ramp up time.
    • Gatling’s scenario can be data driven using CSV files.
    • It can verify response data using check feature.
    • It can repeat the same request using loop.
    • It can manage check and failure.

    In our future post we will discuss more about Gatling.

    Happy Load testing using Gatling!!!

    Cypress: How to handle browser-based authentication pop up dialog in Cypress

    Five years ago I have written a blog on how to handle browser-based authentication for selenium webdriver.   Now it is for cypress. Cypress...