Showing posts with label Window. Show all posts

Sunday, May 1, 2016

Protractor : How to maximize browser window using protractor

In our post on How to automate AngularJS application using protractor we see that browser window is not maximized.

Sometimes we need to maximize our browser window at the time of automation. Protractor has given us a nice command to execute such instruction.

In protractor we write script in our conf.js file using onPrepare  function. 

The script will be,

browser.manage().window().maximize();

In our example we use our project that we develop for one of our previous post.

Step 1 : Open the project and open conf.js file and write the above code in onPrepare function like the following.

image

Note that onPrepare is a function that fires at the time of executing script. So when browser window opens and it first maximize its browser window and then start navigate to the url.

Step 2 : Now conf.js file look like the following.

image

Step 3 : Run selenium server and then run the script using the following command.

image

image

Note that when browser window opens it first shows a relatively smaller window and then it become maximize to show full screen.

That’s all for now. More new things are coming.

Wish you a happy e2e testing!!!

Thursday, July 2, 2015

Selenium : How to upload file in selenium WebDriver using C#

In many of the test scenarios, we need to upload file to test that file upload features are working or not. In case of image file we need to ensure that uploaded images are properly displayed. At the time of writing automated script on file upload we have to interact with the web element as well as windows file upload dialog. Our Selenium WebDriver API can only works on clicking the button to display the File Upload dialog but cannot interact with the file dialog. In this situation we need to use the power of C#.

.Net has a library to handle file upload dialog. It has a SendKeys class that has a method SendWait(string keys). It sends the given key on the active application and waits for the message to be processed. It does not return any value. 

image

Common syntax to use this command,

SendKeys.SendWait(string keys);

Here keys is the string of keystrokes.

For example in C#,

image

First line of SendKeys.SendWait() takes a string as argument that it writes the file name text box of file upload window.

Second line of SendKeys.SendWait() takes a string like “{Enter}” that it executes the enter key from keyboard.

Note that we need to add System.Windows.Forms namespace to get this method.

image

Lets do a short project on how we can implement in our test scenario. For example we have the following page where we have to upload an image.

Page link : http://nervgh.github.io/pages/angular-file-upload/examples/image-preview/

image

Step 1 : Open Visual Studio and create a new project with Console Application type.

image

Step 2 : Add a reference for Webdriver from Nuget package manager. How to add a reference from Nuget package can be found in my another post.

image

Step 3 : Write the following code for opening page using Firefox Browser under static void Main(string[] args) method.

image

Note that we need to add following namespaces for webdriver.

image

Step 4 : Write the code for clicking on Browse button of the page to open file upload dialog.

image

Step 5 : Write the code to handle file upload dialog to browse image and click open button.

image

image

Note : Sometimes we need to add Thread.Sleep(30) method between these two SendKeys.SendWait() method to stop to press enter key until File name typing is complete. We see system sometimes try to type quickly on file name box and do missing some part from beginning and at the time if enter key pressed System throws a invalid file path error message. To prevent this message we use this statement. We have to add System.Threading namespace to implement this statement.

Note that we need to add the following namespace SendKeys.SendWait().

image

We will not get this namespace if we do not add “System.Windows.Forms” reference from Reference manager window. We get this reference by right clicking on Reference and click on Add Reference option.

image

image

Reference section will be,

image

Step 6 : Click on Upload button of the page.

image

image

Step 7 :  Now close the driver. Main method will be,

image

Step 8 : Run the application by clicking on Start button. It opens the browser and upload the image file using SendKeys.SendWait() methods.

That’s all for now. In our future post we will show on how we can upload file using Java.

Till then ….Happy scripting with Selenium  Webdriver using the power of C#.

Monday, May 18, 2015

Sikuli : Commands used in Sikuli IDE

In our last post on Sikuli we have shown how we can automate a desktop application using Sikuli IDE with image recognition technique. Here we will discuss about the command used in Sikuli IDE.

Command List : Command list is displayed at left side panel. With the help of these commands we will write the scripts. There are four sections in the command list.

  1. Settings : By checking Auto capture options can be enabled or not.
  2. Find : These Command lists help the tester to write script to find an UI object.
  3. Mouse Actions : All the commands is this section are related mouse actions.
  4. Keyboard Actions : All the Keyboard related commands are there.

image

1. Settings : If Auto Capture option is uncheck then Sikuli IDE will not go to Screen Capture when click any command name from Command list. 

For example if we click on click() command after unchecking the Auto Capture option, it just displays the command name at the script editor like the following,

image  

Note that a camera icon is displayed at the click(camera icon) command as argument. By clicking on camera icon Sikuli IDE will move to screen capture mode and then UI can be captured.

SNAGHTML109bb85e

If we click on left mouse button at screen capture mode we can back to Sikuli IDE without capturing any screen UI object.

If Auto Capture option is checked and click on a command then it automatically goes to screen capture mode and a text displays on the screen “Select an image”.

image

Clicking on Expand/Collapsed button, commands section can be expanded and collapsed.

image

2. Find : In this section, all the Sikuli IDE command related to find an UI objects are displayed. There are five commands here.

  • find(captured image) : It finds out the given captured image on the screen. General syntax of find() command.

find(captured image)

For example,

image 

  • findAll(captured image) : It return all the available locations of the given captured image on the screen. If there are multiple UI images on the screen then we can use this findAll() and gets all the locations of the given images. We can use loop structure to access all the images. Note that Sikuli script editor supports python language.

  • wait(captured image) : It waits for the given image to appear. It takes two arguments- one is the captured image and other is the time to wait. Time is counted as millisecond. General Syntax,

wait(Captured image, timestamp)

Note that we can use the constant “FOREVER” in place of timestamp that waits for the captured images up to indefinite time.

image 

  • waitVanish(captured image, timestamp) : It waits for the given image to vanish. The same syntax here as wait(),

waitVanish(Captured image, timestamp)

  • exists() : It returns the matched UI object that is given as an argument. It the captured image given as an argument it checks and returns match object if it is matched on the screen. Generally we use it to verify expected value on our scripting. General syntax,

exists(Captured image, [timestamp])

Note that here timestamp is the time to wait for the image to appear and it is optional. We can set default time.

image

3. Mouse Actions : Sometimes we need to click on a button, check/uncheck a check box or option button or set focus on a text box, all of the cases we have to handle mouse event. Commands on this section will perform this activities.

  • click(captured image) : It is used to click on a captured image. General syntax,

click(Captured image)

For example, if we want to click on a button on our calculator application, command will be,

image

Note that here click means mouse’s left button click.

  • doubleClick(captured image) : It is used to double click on a captured image. General syntax,

doubleClick(Captured image)

image

Note that here click means mouse’s left button click.

  • rightClick(captured image) : Clicking by Right mouse button on a captured image. General syntax,

rightClick(Captured image)

image

  • hover(captured image) : If we want to hover mouse pointer on an UI object then we use hover() command. General syntax,

hover(Captured image) 

Note that it returns 1 if it finds the UI image similar to captured image or 0 if it does not.

image

  • dragDrop(source image, destination image) : It is used to drag an object from a location and drop it to other location. General syntax,

dragDrop(source image, destination image)

image

4. Keyboard Actions : In order to enter data as input in a text box or copy/paste input data we need to handle keyboard actions and in that we have to write keyboard command. In Sikuli, following commands are used.

  • type(text) : If we want to type some text on a text box we can use this command. It takes text as argument. Most of the cases we click on a text box to set focus and then type text. General Syntax,

type(text)

image

Note that it supports all keyboard commands like TAB, ESC etc.

  • type(captured image, text) : This command first finds the captured image and then type the text it that area. General Syntax,

type(captured image, text)

image 

  • paste(text) : If we want to paste a text to a location then we can use this command. General Syntax,

paste(text)

image

  • paste(captured image, text) : If we want to paste text to a desired location that is captured by an image we can use this paste() command. general syntax,

paste(captured image, text)

Here captured image is the location where given text is pasted.

image

Happy Scripting by capturing UI image using Sikuli….!!!

Saturday, May 16, 2015

Sikuli : Introduction to Sikuli IDE

In our last post on Sikuli we have shown how we can automate a desktop application using Sikuli IDE with image recognition technique. There we have shown the steps to automate a desktop application and discussed about the Sikuli IDE. Here we will discuss more details on it.

Sikuli IDE is noting but an IDE where we can build Sikuli script and run it.

 [image161.png]

Title Bar : It displays the application name “Sikuli IDE 1.0.1” with the Script file name. Default name is “Untitled”.

Menu Bar : It contains all the available menus.
  1. File : All the basic options are there. There is a Preference option to set the Sikuli settings.
  2. Edit : All the basic options are there.
  3. Run : There are two options – Run and Run in Slow motion. If you want to run script slowly you can use this “Run in Slow motion” option.
  4. View : View the command list and menu.
  5. Tools : All the tools option.
  6. Help : Sikuli help and FAQ document.
Tool Bar : It contains Six options.
  1. Take screenshot : Clicking on this button Sikuli starts to capture the image of an UI object bye which we will use it for scripting.
  2. Insert image : Through this option we can insert image from other location captured by other image captured tool.
  3. Create Region : We can create a region to help Sikuli to search the UI object to within this region by this option.
  4. Run : By clicking this button we can run the Sikuli script written at the Below editor.
  5. Run in Slow Motion : By using this option we can run the script slowly.
  6. Find : Find some text within the script.
Command List : Command list is displayed at left side panel. With the help of these commands we will write the scripts.
  1. Settings : By checking Auto capture options can be enabled or not.
  2. Find : These Command lists help the tester to write script to find an UI object.
  3. Mouse Actions : All the commands is this section are related mouse actions.
  4. Keyboard Actions : All the Keyboard related commands are there.
Note that we will discuss more details on command list in a separate blog post.

image

Script Editor : All the scripts are written here and user can modify it. Note that Sikuli IDE support python language syntax. So we can write our python code here and make the script more robust and maintainable and implement different programming techniuqe using the power of python programming language.

That’s all for now. We will do more discussion on our future post on Sikuli and its future.

Happy Scripting by capturing UI image using Sikuli….!!!

Thursday, May 14, 2015

Sikuli : How to automate an application using Sikuli IDE

In our last post on Sikuli we have shown how to install Sikuli in a Windows Machine. Here we see how we can automate a desktop application using Sikuli IDE with image recognition technique.

At First we need to write a test case we have to automate using Sikuli. In our case, we will use our built in Calculator application.

Test Case : Verify the add functionality of our calculator application.

  1. Open the application
  2. Click on (7) seven button
  3. Click on plus (+) button
  4. Click on (3) three button
  5. Click on (=) equals button
  6. Verify the result

Step 1 : Go to installation directory where our Sikuli is installed. In my case it is “C:\Sikuli". Those who follow my last post on Sikuli can view the same location.

image

Step 2 : Double click on the file name “sikuli-ide.jar”. You can create a shortcut of this file to show your desktop.

image

Step 3 : Runtime options window displayed and click on OK button.

image

Step 4 : Sikuli IDE window is displayed.

image

Step 5 : We need an introduction on the IDE.

Title Bar : It displays the application name “Sikuli IDE 1.0.1” with the Script file name. Default name is “Untitled”.

Menu Bar : It contains all the available menus.

  1. File : All the basic options are there. There is a Preference option to set the Sikuli settings.
  2. Edit : All the basic options are there.
  3. Run : There are two options – Run and Run in Slow motion. If you want to run script slowly you can use this “Run in Slow motion” option.
  4. View : View the command list and menu.
  5. Tools : All the tools option.
  6. Help : Sikuli help and FAQ document.

Tool Bar : It contains Six options.

  1. Take screenshot : Clicking on this button Sikuli starts to capture the image of an UI object bye which we will use it for scripting.
  2. Insert image : Through this option we can insert image from other location captured by other image captured tool.
  3. Create Region : We can create a region to help Sikuli to search the UI object to within this region by this option.
  4. Run : By clicking this button we can run the Sikuli script written at the Below editor.
  5. Run in Slow Motion : By using this option we can run the script slowly.
  6. Find : Find some text within the script.

Command List : Command list is displayed at left side panel. With the help of these commands we will write the scripts.

  1. Settings : By checking Auto capture options can be enabled or not.
  2. Find : These Command lists help the tester to write script to find an UI object.
  3. Mouse Actions : All the commands is this section are related mouse actions.
  4. Keyboard Actions : All the Keyboard related commands are there.

Note that we will discuss more details on command list in a separate blog post.

image

Step 6 : Now start writing the script using Sikuli IDE.

  • At first we need to open the application. For this we need to click the calculator icon located  at the task bar. Now click on “click” command from left side command list.

image

  • Sikuli IDE will be disappeared and screen will be fade. A text “Select an image” is displayed at desktop and mouse icon changed to cross (+).

 image

  • Now drag the mouse pointer on the calculator icon to capture the whole area like the following.

  image

  • Releasing mouse left button appears the Sikuli IDE and command is displayed at the sikuli editor.

image 

  • Note that “click()” command is displayed with captured image as argument.

Common syntax of a command,

commandName(captured Image)

commandName : it is the name of the command like “Find()”, “click()” etc.

captured image : You can capture image using IDE or any tool.

  • Click on (7) seven button. For this step, go to command list and click on “click()” command and drag the mouse pointer over the button “7”. It captured the image of Seven(7) button and displayed it to the Sikuli script editor like the following.

image

  • Click on plus (+) button. Do the same as we have done for seven (7) button.

image

  • Click on (3) three button

image

  • Click on (=) equals button

image    image

  • Verify the result. In order to verify the result, click on exists() command and drag the mouse pointer to result area and the command will look like the following.

 image  image 

Note that exists() commands compare the image with the captured image.

After that the script will look like as the following,
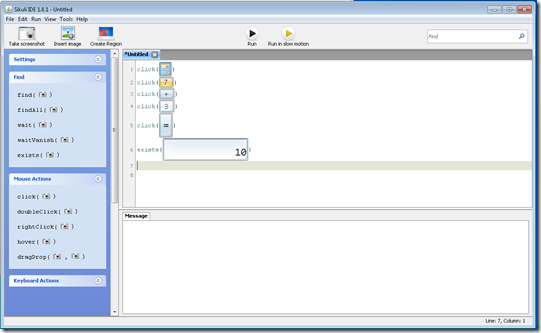
image

Step 7 : Save the script by clicking File >> Save.

image

Step 8 : Enter the script name “CalculatorTest” at the File save Text box. Note that it has default file extension “*.sikuli”. Click on Save button. It has been saved to a desired location.

image

Step 9 : Run the script by Clicking Run button on the Toolbar.

image

The script will run. It opens the calculator by clicking on toolbar icon, then click on 7,+,3,= buttons and then verify the image with the result box. After Run the Sikuli IDE will look like the following,
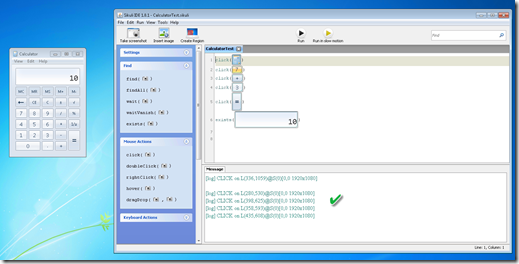
image

Note that you can use Run in Slow motion button to run the script slowly.

That’s all for now. We will do more discussion on our future post on Sikuli and its future.

Happy Scripting by capturing UI image using Sikuli….!!!

Cypress: How to handle browser-based authentication pop up dialog in Cypress

Five years ago I have written a blog on how to handle browser-based authentication for selenium webdriver.   Now it is for cypress. Cypress...