Monday, August 15, 2016

Protractor: How to check npm, node and protractor current version and install the new update

Sometimes we need to know the current version on npm, node and protractor. Since the community is releasing the latest version continuously, we have to install those updated release frequently.

The following commands are needed to check the version and install the latest one. For this we need to open a command prompt and write the following code command.

npm:

  • Version

npm -v

  • To install the latest version: npm install npm@latest –g

Now check the new version: npm –v

Node:

  • Version: node –v
  • To install the latest version:
    • Just go to Node JS site and install the latest version.

Protractor:

  • Version: npm protractor –version
  • To install the latest version:
    • npm install protractor@latest -g

Thursday, July 14, 2016

Protractor : How to generate single report for test suites

In order to generate aggregate reports we need to use consolidate option.

We will use our Suite projects that was develop through our post on how to implement suites in protractor.
We implement consolidate option on config.js file here.

Step 1 : Open the project and implement protractor-jasmine2-html-reporter package by using this post.

Step 2 : Open config.js file and write the following script and implement onPrepare() function.

image

Note that all the codes of onPrepare() function comes from the previous post except consolidate option. We make consolidate as true.

Step 3 : After running the script we see separate suite names at the report and all the suites reports are generate in a single html file.

image

Step 4 : If we make consolidate as false and run the script we see reports are generated in two separate files for two suites.

image

After running script,

image

We see reports for only one suite.

image

Step 5 : Now add another option consolidateAll and make it true.

image

After running the script we see all the suite report in a single file.

image

That’s all for now.

Happy end to end testing using Protractor!!!

Thursday, July 7, 2016

Protractor : Implementing different options for HTML reporter

In our last post we have seen that how we can generate HTML report using HTML reporters. Here we will see different options for it. 

In this post we will use our sample projects that was built in our previous post.

Step 1 : Open the project.

Step 2 : Now open config.js file. Implement the following options.

Option 1 : Report path

We can define our own report path where we store the generated report. For this we need to write the following script in onPrepare() function,

image 

Here,

jasmine.getEnv().addReporter(): It create report after executing the script.

Jasmine2HtmlReporter() : It generate HTML report.

savePath: Report folder where report is generated. User can define his own path.

Option 2 : Screenshot

We need to take screenshot of every page or the result pages. We can add screenshot option at onPrepare() function. Screenshot stores in a default folder named “screenshots”. We can define screenshot folder name instead of default name. We need to write the following code in the onPrepare() function.

image

Here ‘images’ is the folder name.

If you run the script you see that screenshot is created at ‘images’ folder.

image

Option 3 : Screenshot optional

We can make the screenshot taking optional. We can make takeScreenshots to false to stop taking screenshot. Default option is true.

  image

If you run the script it does not take any screenshot.

image

Option 4 : Screenshot only for failure cases

We can take screenshot only for failure cases like one of the test case fails and then it takes screenshot. In that case we need to make takeScreenshotsOnlyOnFailures to true.

Note that if you have takeScreenshots option as false, you have to make it true otherwise takeScreenshotsOnlyOnFailures option will not work.

image

Now modify the test script so that test can fail. Now run the script and inspect that screenshot is created and for failed test cases.
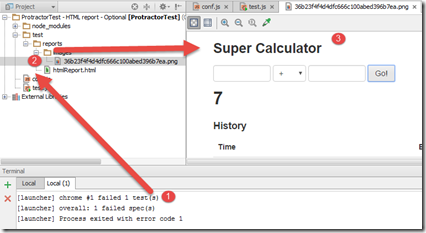
image

Since default value of takeScreenshotsOnlyOnFailures option is false, so screenshot will be created by default.

Option 5 : Screenshot File name

We can fix the screenshot file name using fixedScreenshotName option to true. Name of the screenshot will be the test case name that we define after it clause.

image

image

After running the script we see screenshot is created and the name of screenshot file is the test case name. In my case, this is 'should add two numbers'.

image

Note that default value of fixedScreenshotName option is false.

Option 6 : File prefix of Report file name

filePrefixWe can modify the report file name instead of using its default name htmlReport.html. We can use prefix with the file name. For this we have to add filePrefix option and mention the prefix name as value. In my case I use the “Addition’' as prefix.
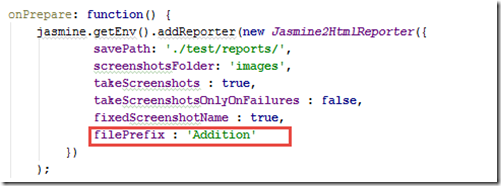
image

After running the test we see html report is created with the prefix “Addition’'.

image

Option 7 : Consolidate and ConsolidateAll

If you have multiple test suites and you want to create separate reports for every test suite then these option will help you. We have a separate blog post coming after this post.

Step 3 : Now config.js file will look like the following,

image

Step 4 : Now open terminal window and run selenium server.

image

Step 5 : Open another terminal window and run the script.

image

Step 6 : Note that script executes and report file and screenshot are created according to option 1 to option 6.

image

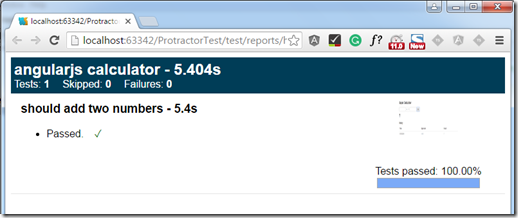
Now double click on the Addition.html file and see the result.

image

You can also open it through a browser.

image

Clicking on right side screenshot image you will see the screenshot in browser.

image

That’s all for now.

Happy end to end testing using Protractor!!!

Friday, June 10, 2016

Protractor : How to implement HTML report in Protractor

In our last post we have seen that how we can generate XML report using XML reporter. Here we see how we can implement Jasmine HTML reporters.

In this post we will use our sample projects that was built in our previous post.

Step 1 : Open the project.

Step 2 :  Open Terminal window and install protractor-jasmine2-html-reporter package using the following command.

npm install protractor-jasmine2-html-reporter --save-dev

image

It installs the following packages

image

Step 3 : Now open config.js file and the following variable for Jasmine2HtmlReporter

var Jasmine2HtmlReporter = require('protractor-jasmine2-html-reporter');

Write the following script in onPrepare() function,

image

Here,

jasmine.getEnv().addReporter(): It create report after executing the script.

Jasmine2HtmlReporter() : It generate HTML report.

savePath: Report folder where report is generated. User can define his own path.

Step 4 : Now config.js file will look like the following,

image

Step 5 : Now open terminal window and run selenium server.

image

Step 6 : Open another terminal window and run the script.

image

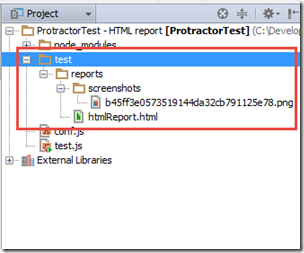
Step 7 : Note that script executes and report file is created at ‘reports’ folder.

image

Now double click on the htmlReport.html file and see the result. You can also open it through a browser.

image

image

Clicking on right side screenshot image you will see the screenshot in browser.

That’s all for now.

In the next post we will see how we can generate HTML report with different options.

Happy end to end testing using Protractor!!!

Protractor : How to implement HTML report in Protractor

In our last post we have seen that how we can generate XML report using XML reporter. Here we see how we can implement Jasmine HTML reporters.
In this post we will use our sample projects that was built in our previous post.
Step 1 : Open the project.
Step 2 :  Open Terminal window and install protractor-jasmine2-html-reporter package using the following command.
npm install protractor-jasmine2-html-reporter --save-dev
image
It installs the following packages
image
Step 3 : Now open config.js file and the following variable for Jasmine2HtmlReporter
var Jasmine2HtmlReporter = require('protractor-jasmine2-html-reporter');
Write the following script in onPrepare() function,
image
Here,
jasmine.getEnv().addReporter(): It create report after executing the script.
Jasmine2HtmlReporter() : It generate HTML report.
savePath: Report folder where report is generated. User can define his own path.

Step 4 : Now config.js file will look like the following,
image
Step 5 : Now open terminal window and run selenium server.
image
Step 6 : Open another terminal window and run the script.
image
Step 7 : Note that script executes and report file is created at ‘reports’ folder.
image
Now double click on the htmlReport.html file and see the result. You can also open it through a browser.
image
image
Clicking on right side screenshot image you will see the screenshot in browser.
That’s all for now.
In the next post we will see how we can generate HTML report with different options.
Happy end to end testing using Protractor!!!


Tuesday, May 31, 2016

Protractor : How to implement XMLreports in protractor

In the post on how to automate web application using protractor we see that we ran the application and it just print test result at terminal window.

Here we see how we can implement Jasmine reporters. We will use xml reports.

In this post we will use our sample projects that was built in our previous post.

Step 1 : Open the project.

Step 2 :  Open Terminal window and install jasmine-reporters package using the following command.

npm install jasmine-reporters

 image

It installs two packages jasmine-reporters@2.1.1 and  mkdirp@0.3.5.

image

Step 3 : Now open config.js file and write the following script in onPrepare() function,

image

Here,

jasmine.getEnv().addReporter(): It create report after executing the script.

JUnitXmlReporter() : It generate XML report.

consolidateAll : Aggregate all the results. 

savePath: Report folder where report is generated. Use can define his own path.
filePrefix: Generated file name.

Step 4 : Now config.js file will look like the following,

image

Step 5 : Now open terminal window and run selenium server.

 image

Step 6 : Open another terminal window and run the script.

image

Step 7 : Note that script executes and report file is created at ‘testreport’ folder.

image

Now double click  to open the XML report and see the result. You can also open it through a browser.

image

That’s all for now.

In the next post we will see how we can generate HTML report.

Happy end to end testing using Protractor!!!

Cypress: How to handle browser-based authentication pop up dialog in Cypress

Five years ago I have written a blog on how to handle browser-based authentication for selenium webdriver.   Now it is for cypress. Cypress...