Showing posts with label Java. Show all posts

Sunday, June 14, 2015

Selenium : How to handle browser based authentication using Selenium Webdriver

Couple of years ago, I got an issue about browser based authentication and I googled about it and found the resolution. In recent days I face the same problem. I forgot to fix and again googled and found lots of automated testers like me are facing the same problem. Now I decide to write a small post on it so that I can remember every time from my post and also I can help our automated testers.

A very simple syntax to handle the browser based authentication,

If we have username and password and the URL then requested URL will be,

http://username:password@domainName.com

Note that we have a special character colon “:” between username and password.

For example, we have
username : abc
password : abc123
URL : xyz.com
then the requested URL for Selenium Webdriver command,
abc:abc123@xyz.com
So the Selenium Webdriver command to open application in a browser,

(C#)
driver.Navigate().GoToUrl("http://abc:abc123@xyz.com/");

(Java)
driver.get("http://abc:abc123@xyz.com/");

Thank you…..
Enjoy automated testing using Selenium Webdriver….!!!

Thursday, May 14, 2015

Sikuli : How to automate an application using Sikuli IDE

In our last post on Sikuli we have shown how to install Sikuli in a Windows Machine. Here we see how we can automate a desktop application using Sikuli IDE with image recognition technique.

At First we need to write a test case we have to automate using Sikuli. In our case, we will use our built in Calculator application.

Test Case : Verify the add functionality of our calculator application.

  1. Open the application
  2. Click on (7) seven button
  3. Click on plus (+) button
  4. Click on (3) three button
  5. Click on (=) equals button
  6. Verify the result

Step 1 : Go to installation directory where our Sikuli is installed. In my case it is “C:\Sikuli". Those who follow my last post on Sikuli can view the same location.

image

Step 2 : Double click on the file name “sikuli-ide.jar”. You can create a shortcut of this file to show your desktop.

image

Step 3 : Runtime options window displayed and click on OK button.

image

Step 4 : Sikuli IDE window is displayed.

image

Step 5 : We need an introduction on the IDE.

Title Bar : It displays the application name “Sikuli IDE 1.0.1” with the Script file name. Default name is “Untitled”.

Menu Bar : It contains all the available menus.

  1. File : All the basic options are there. There is a Preference option to set the Sikuli settings.
  2. Edit : All the basic options are there.
  3. Run : There are two options – Run and Run in Slow motion. If you want to run script slowly you can use this “Run in Slow motion” option.
  4. View : View the command list and menu.
  5. Tools : All the tools option.
  6. Help : Sikuli help and FAQ document.

Tool Bar : It contains Six options.

  1. Take screenshot : Clicking on this button Sikuli starts to capture the image of an UI object bye which we will use it for scripting.
  2. Insert image : Through this option we can insert image from other location captured by other image captured tool.
  3. Create Region : We can create a region to help Sikuli to search the UI object to within this region by this option.
  4. Run : By clicking this button we can run the Sikuli script written at the Below editor.
  5. Run in Slow Motion : By using this option we can run the script slowly.
  6. Find : Find some text within the script.

Command List : Command list is displayed at left side panel. With the help of these commands we will write the scripts.

  1. Settings : By checking Auto capture options can be enabled or not.
  2. Find : These Command lists help the tester to write script to find an UI object.
  3. Mouse Actions : All the commands is this section are related mouse actions.
  4. Keyboard Actions : All the Keyboard related commands are there.

Note that we will discuss more details on command list in a separate blog post.

image

Step 6 : Now start writing the script using Sikuli IDE.

  • At first we need to open the application. For this we need to click the calculator icon located  at the task bar. Now click on “click” command from left side command list.

image

  • Sikuli IDE will be disappeared and screen will be fade. A text “Select an image” is displayed at desktop and mouse icon changed to cross (+).

 image

  • Now drag the mouse pointer on the calculator icon to capture the whole area like the following.

  image

  • Releasing mouse left button appears the Sikuli IDE and command is displayed at the sikuli editor.

image 

  • Note that “click()” command is displayed with captured image as argument.

Common syntax of a command,

commandName(captured Image)

commandName : it is the name of the command like “Find()”, “click()” etc.

captured image : You can capture image using IDE or any tool.

  • Click on (7) seven button. For this step, go to command list and click on “click()” command and drag the mouse pointer over the button “7”. It captured the image of Seven(7) button and displayed it to the Sikuli script editor like the following.

image

  • Click on plus (+) button. Do the same as we have done for seven (7) button.

image

  • Click on (3) three button

image

  • Click on (=) equals button

image    image

  • Verify the result. In order to verify the result, click on exists() command and drag the mouse pointer to result area and the command will look like the following.

 image  image 

Note that exists() commands compare the image with the captured image.

After that the script will look like as the following,

image

Step 7 : Save the script by clicking File >> Save.

image

Step 8 : Enter the script name “CalculatorTest” at the File save Text box. Note that it has default file extension “*.sikuli”. Click on Save button. It has been saved to a desired location.

image

Step 9 : Run the script by Clicking Run button on the Toolbar.

image

The script will run. It opens the calculator by clicking on toolbar icon, then click on 7,+,3,= buttons and then verify the image with the result box. After Run the Sikuli IDE will look like the following,

image

Note that you can use Run in Slow motion button to run the script slowly.

That’s all for now. We will do more discussion on our future post on Sikuli and its future.

Happy Scripting by capturing UI image using Sikuli….!!!

Wednesday, April 22, 2015

Robotium : How to automate an Android Application using Record and playback approach

In our last post we see how to install Robotium on our Eclipse IDE. In this post we will explain on how to record an android application and playback the script.

Step 1 : Open Eclipse IDE. Before started recording we need to run the Android virtual device. Click on the Android Virtual device icon.

image

AVD manager window is displayed and start a device that is already configured. How to configure a Virtual device will be posted later in separate post. Select a device and click on Start button.

image

Launch Options window is displayed and click on Launch button.

image

Virtual device will start for Launching.

image

image

Now minimize the virtual device window, close AVD window and proceed for Robotium recording.

Step 2 : Go to File > New > Other

image

Step 3 : Click on Android – Robotium Recorder from New Window. Select New Robotium Test.

Step 4 : Click on Next button.

image 

Step 5 : A pop up dialog is displayed with the message “Please Select the root Java JDK folder”. This message is only displayed if JDK folder is not defined and configured. Click on OK button.

image

Step 6 : Java JDK window is displayed. Locate the JDK folder on the machine. Click Ok button.

image

Step 7 : Robotium Recorder window is displayed and select the apk file. In our case we have downloaded android calculator apk file from this location. Select the apk file and enter the project name. Click on Next button.

image

Step 8 : Click on New Robotium Test button.

image 

Step 9 : Recording Started. Wait for the application starts at Virtual device.

image

image

Step 10 : Go to Virtual device window and note that application will start on that window.

Step 11 : Enter 4 at First text box

Step 12 : Click on the second text box and enter 5 at second text box

Step 13 : Click on Multiply button.

Step 14 : Result will be displayed at Result text box.

Step 15 : In order to verify the result click on the Result text box. It will create an assert script.

image 

Step 16 : Note that steps are written at plain text and click on Stop recording button.

image

A window may appear and click on OK button.

image 

Step 17 : Click on Save button

image

Step 18 : A window is displayed to ask for Test Case name. Enter Test Case name as “Multiplication” and click on OK button.

image

Step 19 : Click on Finish button.

image

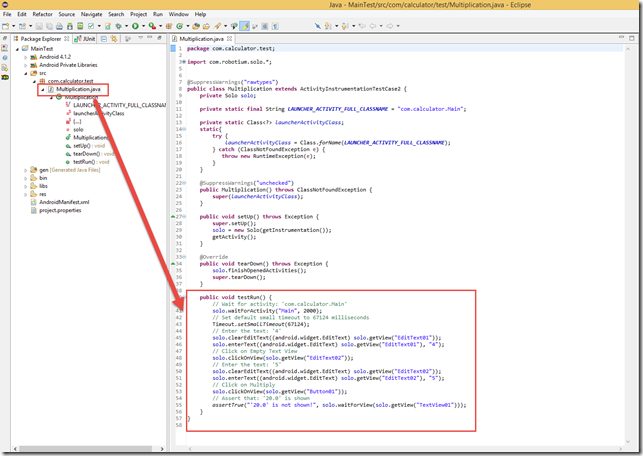
Step 20 : Code will be generated for this script at Eclipse editor. Expand the project of the package explorer window.

image

Step 21 : Double click on the class name “Multiplication.java”. We see the step by step script on the code. We will explain about code on future post.
image 

Step 22 : Now Run the script. Right click on the Script name and click Run as > Android JUnit test.

image

Step 23 : Go to Virtual device window and inspect that script will run and execute test.

image image

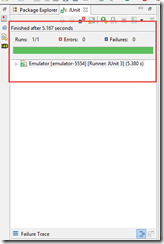
Step 24 : Result is displayed at JUnit Editor.
image

That’s all for now. Our next Robotium related post, we will show on how to refactor the Robotium script and write more manageable test.

Happy Automation day with Robotium …!!!

Saturday, February 21, 2015

Sikuli : How to install and run Sikuli in windows 7

Sikuli is an automated testing tool where one can automate the workflow of the application by using image of an element of UI and searching the image with the help of image detection algorithm. I have already discussed about Sikuli in my previous post. Here I will explain on how Sikuli can be installed and run and what are the pre-requisites we need.

Requirement :

Sikuli can be installed at the following OS and platforms.

  • Windows Xp/7/8 both 32 bit and 64 bit
  • Mac OS 10.6+
  • Linux 32 bit or 64 bit

Pre-Requisite :

Java JRE 6 or JRE 7 preferably the latest version.

Step 1: Install the pre-Requisite

  • Download Java if it is not installed in the PC. Latest Java (JRE) can be downloaded from this link. Note that only JRE 6 or 7 supports Sikuli. Sikuli works well with Windows 7 32 bit OS.
  • After going to Java download page click on “Accept License Agreement” button.

image

  • After clicking License agreement button, it shows the Thank you message.
  • Now click on appropriate Java installer for the machine. In my case, I have selected on “Windows x86 Offline” for my Windows 7 32 bit machine.

image

  • After downloading, double click on the installer “jre-7-windows-i586.exe”.
  • Click on Run button.

image

  • Click on Install button.

image

  • Installation will start.

image

  • Java runtime will be successfully installed. Click on Close button.

image

image

  • Sometimes a pop up can be appeared.
  • Click on Run button

image

  • A message shows that Java is installed properly.

Step 2 : Download Sikuli

Latest and stable version of Sikuli is 1.0.1. Version SikuliX 1.1.0 is final under development.

image

image

  • Sometimes an alert message is shown as I am using chrome browser. click on “Keep” button.

image

  • Download will start.

image 

Step 3 :  Install Sikuli

  • After Finishing download go to the download folder and copy the installer file and paste to a location when you install the file. In my case file location “C:\Sikuli\”
  • Double click on the installer

image

  • An instruction dialog is displayed that instructs to go to the File location and run the file named “runSetup.cmd” and click on OK button.

image

  • Go to the installer file location : “C:\Sikuli\”. Following files are displayed.

image

  • Double click on the file “runSetup.cmd” to run.

image `

  • A  command prompt is displayed. After that a dialog box is displayed with the text “Please read Carefully before proceedings!!”. Click on Ok button.

image

  • SikuliX-Setup window is displayed.

image

  • There are six options displayed on this window.

Option 1 :

image

If you choose this option you will be able to use sikuli IDE (discuss on other posts) and run the Sikuli scripts through command line. Using Sikuli jars you can implement sikuli script with the help of Java or Java aware scripting language and gets supports from Eclipse or NetBeans IDE. Clicking rightmost “…” button will display a dialog showing the details of choosing this option. Click OK button will close this dialog.

 image  

Option 2 :

image

If you choose this option, you can only be able to run the script through command line. Clicking rightmost “…” button will display a dialog showing the details of choosing this option. Click OK button will close this dialog. If Option 1 is selected with this option then you need to run setup again only selecting this option. So the primary objective of this package to run Sikuli script on command line and no need Sikuli IDE.

image 

Option 3 :

image

If you want to develop and run script in Jython language using Eclipse IDE then  you can choose this option. Clicking rightmost “…” button will display a dialog showing the details of choosing this option. Click OK button will close this dialog. Note that you can choose Option 1 or 2 with this option.

image

Option 4 : 

image

If you want to develop sikuli script in Java or Jython using Eclipse/NetBeans or other IDE and you do not need option 1 or 2 you can use this option. Clicking rightmost “…” button will display a dialog showing the details of choosing this option. Click OK button will close this dialog.

image 

Option 5 :

image  

If you want to Tesseract based OCR features you can this option. It is recommended not to use this option if you are new to Sikuli or using Sikuli for the first time. Clicking rightmost “…” button will display a dialog showing the details of choosing this option. Click OK button will close this dialog.

image

Option 6 : 

image

To run the packages (containing Sikuli script) on all supported platforms (Windows, Mac and Linux), you can choose this option. Clicking rightmost “…” button will display a dialog showing the details of choosing this option. Click OK button will close this dialog.

image

  • In my case I have selected Option 1, 2 and 4. Click on Setup Now button.

image

  • A confirmation dialog is displayed to ask about downloading some of the packages. Click on Yes button.

image

  • Downloading starts…

image

  • Some yellow color status text is displayed during installation.

image

  • A status dialog is displayed after installation that it is installed successfully. Click OK button to close the dialog.

image

  • If you go back to the Sikuli installation folder (In my case “C:\Sikuli”), you see some additional files are added and a “libs” folder.

image 

Step 4 : Run Sikuli IDE

  • In Sikuli installation folder, double click on the file named “runIDE.cmd”.

image

  • Sikuli IDE is displayed and we can develop and run script using this IDE.

image

In our future posts, we will show how we can develop script in Sikuli IDE and run it.

Happy Scripting by capturing UI image using Sikuli….!!!

Cypress: How to handle browser-based authentication pop up dialog in Cypress

Five years ago I have written a blog on how to handle browser-based authentication for selenium webdriver.   Now it is for cypress. Cypress...